Contents
1. Introduction
- Who this manual is for
2. How to integrate Rithum Switch
- Rithum Switch installation steps (part 1)
- Rithum Switch Quick Apps in the Fibaro Home Center 3 installation steps
- Fibaro Home Center 3 Climate Panel configuration
- Rithum Switch installation steps (part 2)
3. Temperature Sensor Quick App
4. Thermostat Quick App
5. Rithum Switch Thermostat Display
6. FAQ
- What kind of switch should I use to control the ‘Heating Source’?
- Sometimes there is a difference in set temperatures between the climate zone/Rithum Switch and the thermostat QA in
- app, why is that?
- Can I control Opentherm?
- I created a climate zone, but I can’t see it in the Yubii app. Why?
- There is a temperature difference between the Rithum Switch temperature sensor and another (Z-Wave) temperature
- sensor. Can this be adjusted?
1. Introduction
Using the Rithum Switch not only provides the ability to control scenes and third party devices, it can also be used as a thermostat (Rithum Stat) via it’s built in temperature sensor. The Rithum Switch climate control features toggle preset scenes to enable, or disable, the heating. However, additional functions are required for true integration with the FIBARO Climate Panel. This guide describes the requirements and integration steps so that the Rithum Switch becomes an integral part of the FIBARO Climate Panel.
Who is this manual for?
If you are a Rithum Switch user – or are planning to install a switch in the near future – and want to integrate the thermostat function into the FIBARO climate control system, you will find the necessary information for successful use in this manual.
2. How to integrate Rithum Switch
Requirements
- FIBARO Home Center 3 (HC3) or Home Center 3 Lite (HC3L) compliant with FW 5.120 of higher
- Rithum Switch compliant with FW 3.0 or higher
- FIBARO Core Pro Plugin for Rithum Switch
- FIBARO Climate Plugin for Rithum Switch (Note: this has now been combined with the Fibaro Core plugin)
- FIBARO Quick App Temperature sensor for Rithum Switch
- FIBARO Thermostat Quick App for Rithum Switch
- FIBARO Quick App (download here)
- Laptop/PC with browser and a (wifi) network
Rithum Switch installation steps (part 1)
- Install the Rithum Switch using the supplied installation instructions
- Power on the Rithum Switch and navigate to the settings menu. To do this, click on the tab at the top where the outdoor temperature and time are displayed. Then press and hold the settings button until the menu appears.
- Select ‘Network’, followed by the paired Wi-Fi network. Note the IP Address of the Rithum Switch: _ . . . _
- Go back to settings menu and select ‘Rithum Stat. Make sure ‘Thermostat Enabled’ is disabled. This disables the local thermostat function of the Rithum Switch and allows us to use the Rithum Switch as a thermostat for the FIBARO platform.
- Exit the settings menu and return to the Rithum Switch Scenes Screen.
Rithum Switch Quick Apps in the Fibaro Home Center 3 installation steps
- Open the Home Center 3 (HC3) Dashboard in your laptop/pc browser and login with administrator credentials.
- Open ‘Devices’ in the settings menu of the settings page (cogwheel at the bottom left of screen).
- Click ‘Add device’ button in top right corner.
- Select ‘Other device’
- From the top row option, select ‘Upload file’. Two Quick App files are available for the specific functions:
- Rithum_Switch_Temp_Sensor_QA.fqax : Quick App for the temperature sensor in HC3
- Rithum_Switch_Thermostat_QA.faqx : Quick App to activate Rithum Switch as thermostat in HC3
- Find the Quick App file of the temperature sensor in the folder where it is stored and open the file. The Quick App will be installed and displayed in the device list on the HC3.
- Place the new temperature sensor device in the desired room.
- Repeat steps 3 till 7 for the Thermostat Quick App (if desired)
Note:
The thermostat function depends on the temperature sensor, so both Rithum Switch Quick Apps must be installed to use the thermostat function. If you only want to make the temperature sensor of the Rithum Switch visible in the Home Center 3 platform, the temperature sensor Quick App (QA) will suffice. If multiple Rithum Switches are to be linked to the FIBARO Climate Panel, a Quick App (set) will need to be installed for each Rithum Switch unit.
RITHUM SWITCH TEMPERATURE SENSOR QUICK APP:
- Open the Rithum Switch temperature sensor Quick App (QA) in the ‘Devices’ list and select the ‘Variables’ tab. Enter the required information for the correct operation of this QA here. To do so, use the ‘change icon (pencil) on the right side of the variable.

ip_address: Enter here the ip address of the Rithum Switch that you noted in the first installation section, for example: 192.168.178.15
interval_time: Enter here the number of seconds between ‘retrieval moments’ of the temperature at the Rithum Switch. The default value is 30s.
NOTE: Do not set this time value too low, as it puts unnecessary strain on the network, partly because temperature changes in rooms are usually a slow process.
- Press the ‘Save’ button and shortly afterwards the Rithum Switch temperature will be displayed on the FIBARO Dashboard.
RITHUM SWITCH THERMOSTAT QUICK APP:
- Open the Rithum Switch thermostat Quick App (QA) and select the ‘Variables’ tab. Enter the data required for the correct operation of this QA here. To do this, use the ‘change icon (pencil) on the right side of the variable:
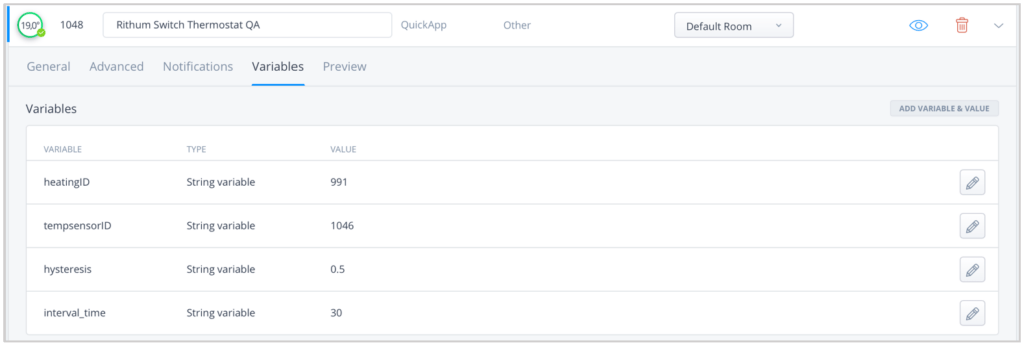
heatingID: Enter here the device ID of the switching unit that switches the heating on/off. This can be a Smart Module or Smart Switch, for example.
tempsensorID: Enter device ID of the room’s temperature sensor here. This will probably be the ID of the Rithum Switch temperature sensor QA, but another temperature sensor is also possible.
hysteresis: This indicates the upper and lower temperature difference at which the thermostat will switch on or off. If the measured temperature is lower than the target temperature minus the set hysteresis, the heating switch will be activated. If the measured temperature is higher than the target temperature plus the set hysteresis, then the heating switch will be deactivated. In between these measured values, no action will be taken.
RECOMMENDED: If you use radiators, a hysteresis of 0.5 degrees is good. For underfloor heating control (= slower), 0.3 degrees is a better setting. Notation of value is integers and a decimal point, so 1 or 0.3
interval_time: Enter here the number of seconds between the ‘control moments’ of the thermostat QA. RECOMMENDED: Do not set this too low, as it puts unnecessary load on the HC3, partly because temperature changes in rooms are usually slow.
- Press the “Save” button
- Both Quick Apps are set and available for use
Fibaro Home Center 3 Climate Panel configuration
- Open the ‘Climate dashboard’ in the settings page (wheel at the bottom left of the screen).
- Create a climate zone for the room where the temperature is to be controlled. To do so, press the ‘Add zone’ button (top right of the dashboard).
- For Climate Configuration, use the ‘Manual’ option, when prompted.
- Give the new climate zone an appropriate name (e.g., ‘Living Room’) and select a temperature sensor from the list. Most likely this will be the Rithum Switch temperature sensor QA, but another temperature sensor is also possible.
- Under ‘Sections / Rooms’, select the ‘Rithum Switch Thermostat’ Quick App so that the Rithum Switch becomes an integral part of the temperature control in that specific room.
- Click ‘Add’ to activate the new zone.
- Set the desired temperatures (set points) per part of the day for the whole week, so that the right temperature is controlled at any time of the day.
RECOMMENDED: It is recommended to do the manual temporary temperature settings per climate zone in app and NOT via the Rithum Switch thermostat QA in the Yubii App, because the climate zone is not using the QA thermostat set point. This might lead to an un-synchronized temporary manual set point.
To prevent such situation, you can choose to ‘hide’ the virtual thermostat. Hiding the Rithum Switch thermostat QA in the FIBARO environment can be done by selecting the virtual device and on the ‘Advanced’ tab select the box for ‘Device hidden’. This makes it disappear ‘out of sight’, but still does its job in the background.
If the thermostat is to remain visible anyway, the advice is not to use it for temporary manual temperature adjustments. Use the climate zone for setting a temporary manual set point.
Note. The Rithum Switch thermostat QA is only suitable for heating. Therefore, always set the operating mode for the climate zone to ‘Heating’.
Rithum Switch installation steps (part 2)
- From the Scenes Screen of the Rithum Switch navigate to the settings menu using the top tab where the outdoor temperature and time are displayed. Then press and hold the Rithum button until the menu appears.
- Go back to main menu and select ‘Integrations’ and then ‘Add Integration’.
- Install the FIBARO Core and FIBARO Climate Plug-in by selecting the relevant plug-in. Fill in the requested data (ip address, login, password). After making connection, click OK.
- Install the FIBARO Climate Plug-in by selecting the relevant plug-in. Select the already connected HC3 so that the Rithum Switch can establish contact.
- From the displayed list, select the device ID of the temperature sensor QA so that it is paired. Repeat this action until all climate zones are provided with correct temperature sensor. Click ‘OK’.
- Return to the beginning of the settings menu.
- Return to the Rithum Switch main Scenes Screen.
This integrates the Rithum Switch into the FIBARO Home Center 3’s climate control system. Multiple Rithum Switches can be added as thermostats, but please note that all separate Rithum Switches each require their own FIBARO plugins that must be purchased per Rithum Switch.
3. Temperature Sensor Quick App
A temperature sensor Quick App allows FIBARO users to access the measured room temperature from the Rithum Switch. The switch is equipped with its own temperature sensor and through this Quick App, the measured value can be used in the FIBARO Smart Home platform. There are several interesting features that become available, such as:
Measured temperature display in FIBARO dashboard and Yubii app:

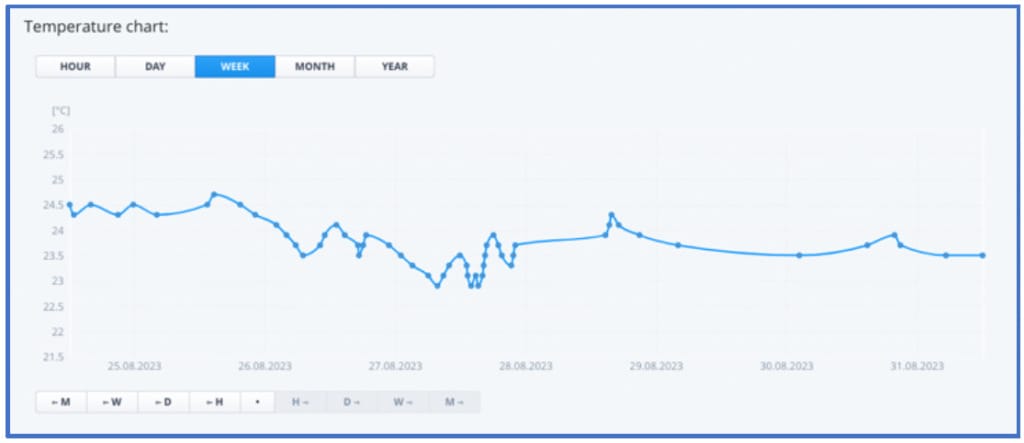
The measured temperature data is stored on the Home Center 3 and can be displayed in a temperature graph. This graph can be found in the device settings of the temperature sensor QA, under the ‘Advanced’ tab.
As input for FIBARO scenes:
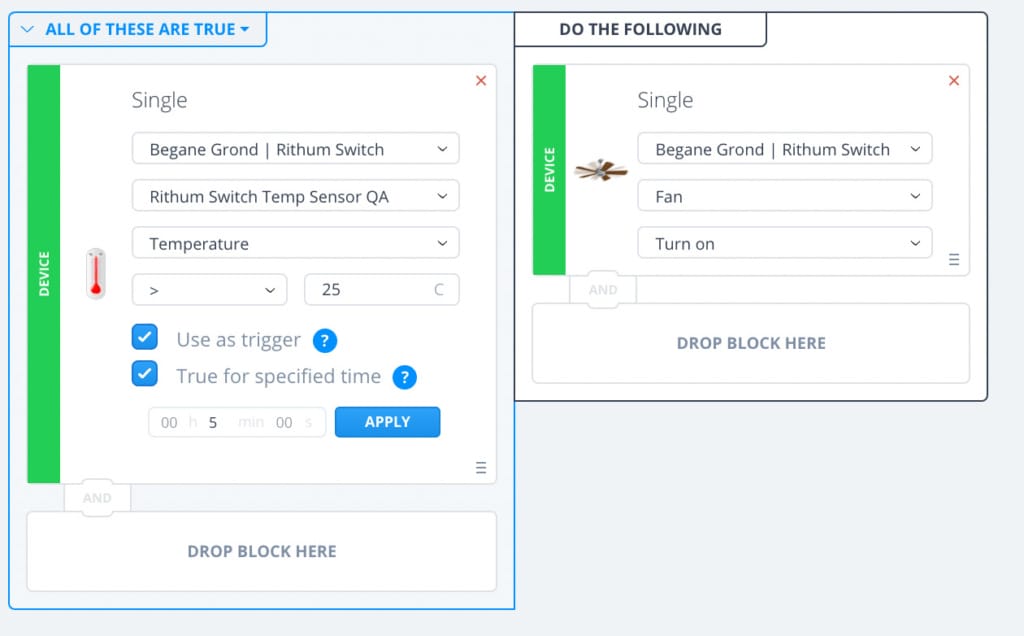
SCENE: If temperature is too high in room for 5 minutes, turn on fan.
4. Thermostat Quick App
Besides measuring temperature, the Rithum Switch is also a thermostat. So wouldn’t it be great if we could fully integrate this ‘thermostat’ into the FIBARO Home Center 3’s climate platform. The Rithum Switch Thermostat Quick App turns the Rithum Switch into a thermostat with ‘hysteresis’ control. The hysteresis value can be used to determine when the heating is turned on or off to keep the desired room temperature. A thermostat with a set temperature of 20 degrees and a hysteresis of 0.5 degrees will behave as follows:
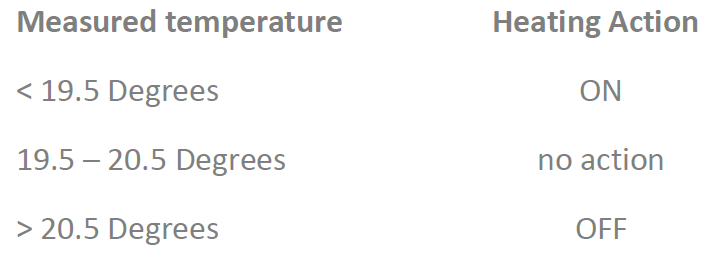
This prevents the heat demand from switching on/off the heat source frequently around the set temperature. Because heating is a rather ‘slow’ process (it takes a while for a room to warm up) and heating methods can vary (radiators, underfloor heating, electric or infrared), it is sometimes a matter of finding out what the best hysteresis value is. The guideline is 0.5 degree for radiators and 0.3 degree for underfloor heating. Sometimes, a small adjustment can give better heating comfort.
With the Thermostat Quick App, the Rithum Switch thermostat can be virtually displayed in the FIBARO environment, such as:
Thermostat view in the FIBARO dashboard and Yubii app.
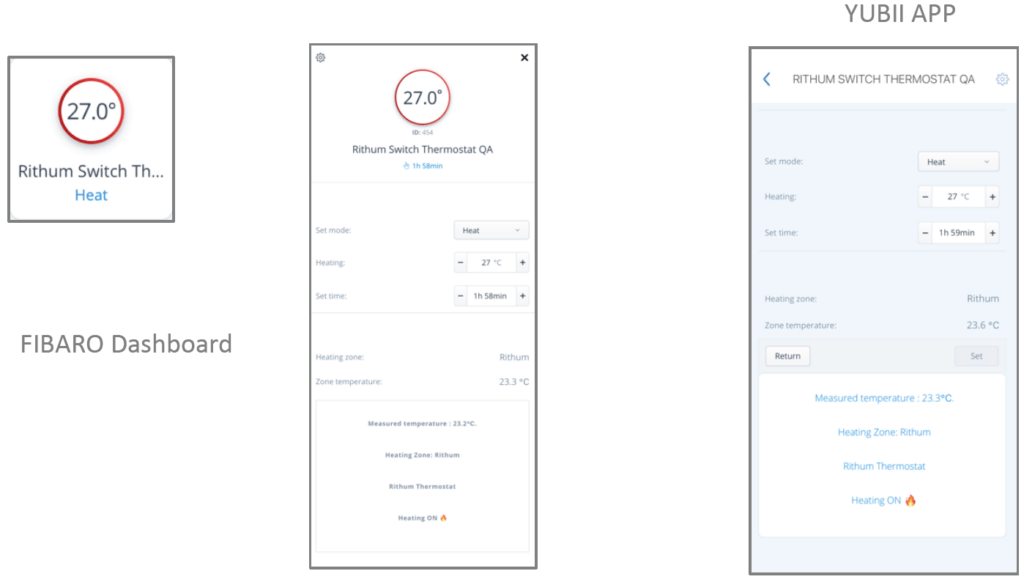
RECOMMENDED: As mentioned earlier, if the Rithum Switch Thermostat Quick App is used together with the FIBARO Climate Dashboard, it is strongly recommended to make temporary (manual) temperature adjustments on the climate zone and not on the thermostat QA. Manual settings on the thermostat in the app are not taken over by the Climate Dashboard, leaving different set temperatures visible. The Rithum Switch Thermostat Quick App does follow the manual settings on the climate dashboard.
5. Rithum Switch Thermostat Display
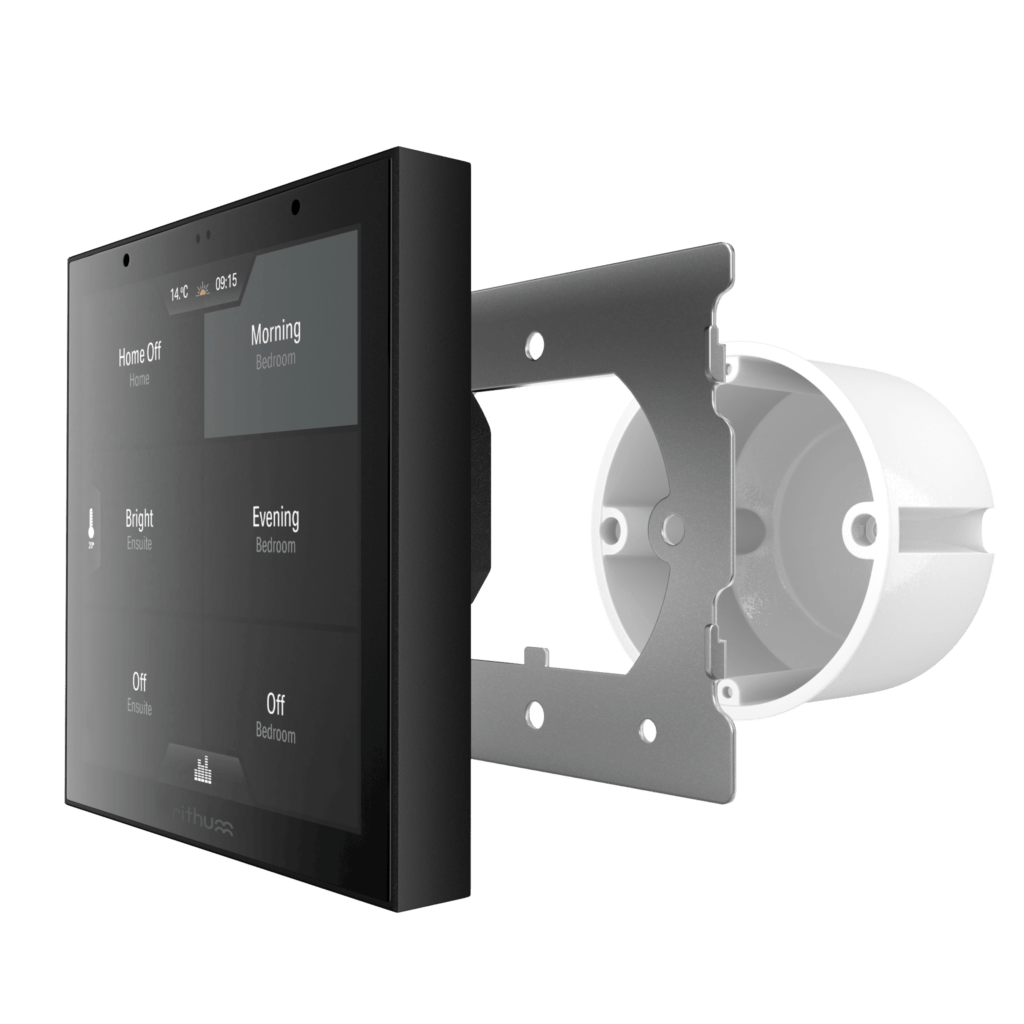
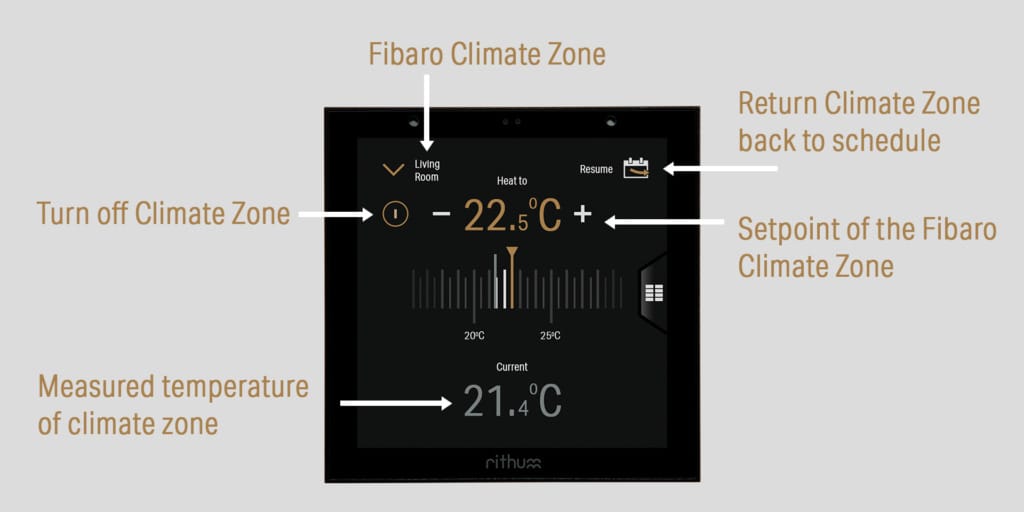
Once the integration is completed according to the steps described in the installation chapters, the Rithum Switch thermostat is a fully functional part of the FIBARO climate control system. The display below shows the specific functions of the Rithum Switch.
6. FAQ
What kind of switch should I use to control the ‘Heating Source’?
This is partly dependent on the type of heat source used, for instance a central heating boiler or an infrared panel. Speak to your Fibaro distributor/installer about the best solution for your scenario.
Sometimes there is a difference in set temperatures between the climate zone/Rithum Switch and the thermostat QA in app, why is that?
Probably the desired temperature is set on the thermostat QA, it does NOT transmit the set temperature to climate zone. Changing the set point temperature manually on the thermostat QA has little added value. If the set point temperature needs to be temporarily adjusted, do so in the specific climate zone!
By changing the desired temperature setting on the Rithum Switch, you change the setting of the linked climate zone, not that of the thermostat QA. If the climate zone is changed, the thermostat QA will adopt the new setting.
The advice is to hide the thermostat QA. It continues to operate as a thermostat, only the settings are not visible to the user.
Can I control Opentherm?
No, Opentherm is a particular heating protocol used only by specific manufacturers. The Quick App virtual thermostat is based on ON/OFF switching of the boiler. Modern central heating boilers are perfectly capable of modulating themselves to achieve energy efficiency. Should Opentherm control be desired, it is possible to link a TADO heating solution to the Rithum Switch via our Tado plugin.
I created a climate zone, but I don’t see it in the Yubii app. Why?
- Go the settings page on the Home Center 3 dashboard
- Choose the option 6. Access
- Select the relevant user and press the ‘Manage access’ button
- In the top menu, select ‘Temperature zones’
- Select the climate zone(s) you want to give the relevant user access to
- Press “Save”.
There is a temperature difference between the Rithum Switch temperature sensor and another (Z-Wave) temperature sensor. Can this be adjusted?
Leave the temperature sensors in the same place for some time (~1 hour) so that they can both ‘acclimatize’. Should the measurement result still deviate (> 0.5 degree), then look at the next step.
Due to various causes, temperature differences can occur between different (types of) temperature sensors. To compensate for this, so-called ‘off-set’ values can be entered. In the settings of the Rithum Switch temperature sensor QA, on the ‘Advanced’ tab you can find a slider with which measurement differences can be compensated.

No new temperature readings are reported anymore. What could that be?
Possibly the temperature sensor is no longer connected to the Rithum Switch. This can be checked in the preview screen (eye icon) on the Yubii app or the Home Center 3 dashboard. The message below may be displayed.
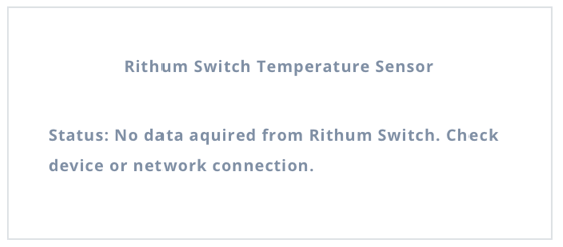
Usually, the Rithum Switch has received a new IP address from the network. As a result, the HC3 cannot reach the Rithum Switch, so please check the IP address of the Rithum Switch and make sure it is the same the IP address in the variables of Quick App.
NOTE. In some routers, it is possible to ‘lock’ the IP address to a specific device. Then the device will always get the same ip address from the router. This is called ‘IP reserving’, ‘Fixed IP’ or ‘IP binding’, depending on the brand of network router.
The Quick App stops with a message ‘attempt to index nil value’ in FIBARO Console. What could it be?
This message indicates that information is not there or is incorrect. Check the data entered in the variables; that no fields are empty, the data entered is correct and that the HeatingID is present in the system.

