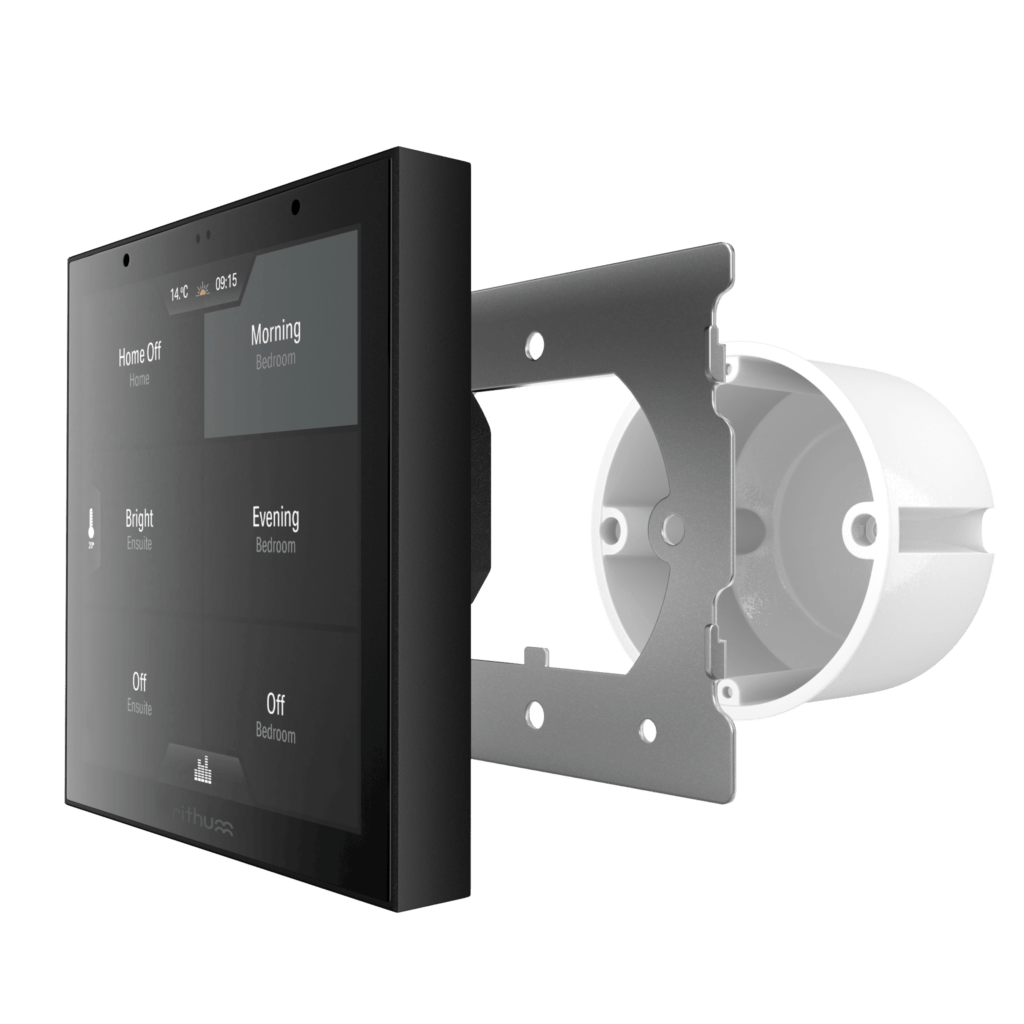
If you’re looking to upgrade your home to a smart home, installing a smart switch is a great place to start. With the Rithum Smart Switch, installation is a breeze thanks to its sleek design that can be easily swapped out with your standard switches. You can transform your home into a smart home almost immediately with the added convenience and control of remote access to your lighting. In this article, we’ll guide you through the simple process of how to install a smart light switch and how it can enhance your overall home automation experience.
How does a smart switch work?A smart switch works by providing wireless connectivity to your home’s lighting and electronics, allowing for remote control through a smartphone app, voice commands, or a smart home assistant.
First things first
Before you set up your smart switch, you need to ensure you have three things:
- A strong and stable Wi-Fi connection. This is because the SmartSwitch integrates with third party systems over Wi-Fi so, a strong Wi-Fi signal throughout your home is recommended.
- A Philips Hue bridge or Sonos audio player. These are the two integrations that we currently have, but we’re working hard behind the scenes to give you more smart technology in the future.
- A knowledge of wiring and electrics. It’s vital that you know what you’re doing when working with wires and if you don’t, seek the help of a professional.
Once you have these, you’re good to go and begin setting up.
Smart Switch Wiring
We must reiterate that you have to have knowledge of wiring and electrics in order to install your SmartSwitch. If you’re not 100% sure then please do not attempt it. Always seek the aid of a professional if you’re not sure.

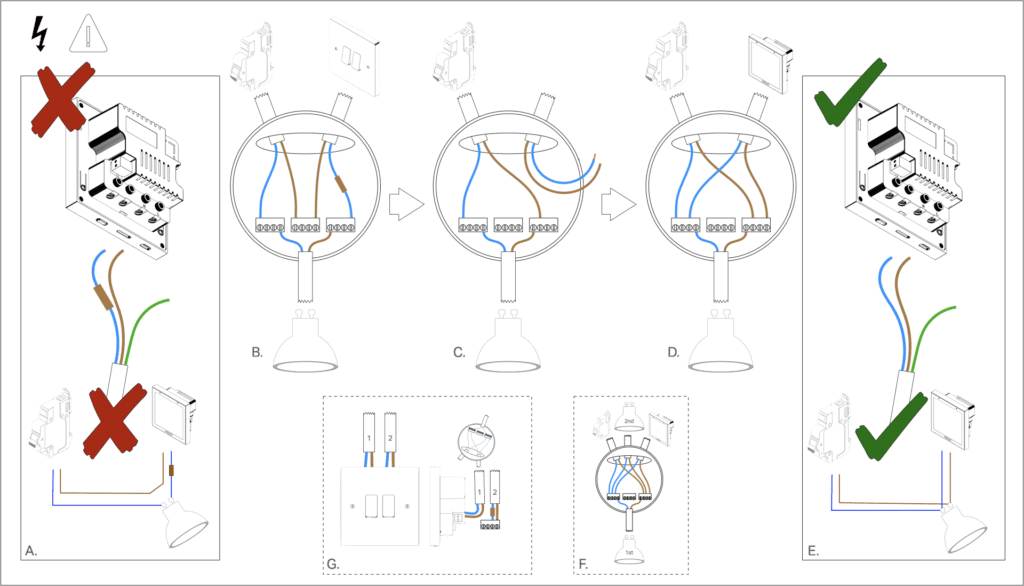
Smart Switch is mains powered and requires a neutral, meaning that it should be wired parallel to your bulbs as opposed to in series with them. In most cases, a rewire is not needed, and can be done with a simple tweak as shown below.
What Does The Neutral Wire Do? The neutral wire completes an electrical circuit and carries current back to the power source.
The initial step is to make sure that your power is switched off. After that, understand that what you’re doing is permanently energising the smart bulbs and using the original switch wire to send both the live and the neutral back down to the switch.
Most UK homes will not have a neutral at the switch location (A), and instead have a switched-live which is usually marked with brown tape. Because of this, a minor change has to be made in order to utilise the existing wiring. If you do have a neutral at the switch location, then the same process applies, just at the switch itself rather than the light location.
- In the diagram above, (B) displays the starting point for the wiring within a downlight or ceiling rose. The switch is in series with the bulbs to start with, making and breaking the circuit when switched. To permanently energise the bulbs (C), hook the incoming power feed directly up to them.
- Connect the wire from the switch in parallel (D) in order to send both a live and neutral back down to the switch location – this converts the switched-live back to neutral so feel free to now remove the brown tape (E).
- Connect any additional bulbs in parallel (F).
- If the switch has two cables (for two circuits, for example), then the live and switched live in the second cable can be connected (G) with a suitable connector. This permanently energises that cable as well, only from the switch location rather than the rose.
Remember: This process is only possible with smart bulbs, so make sure you have your Philips Hue ready to go!
Installing a Rithum Smart Switch
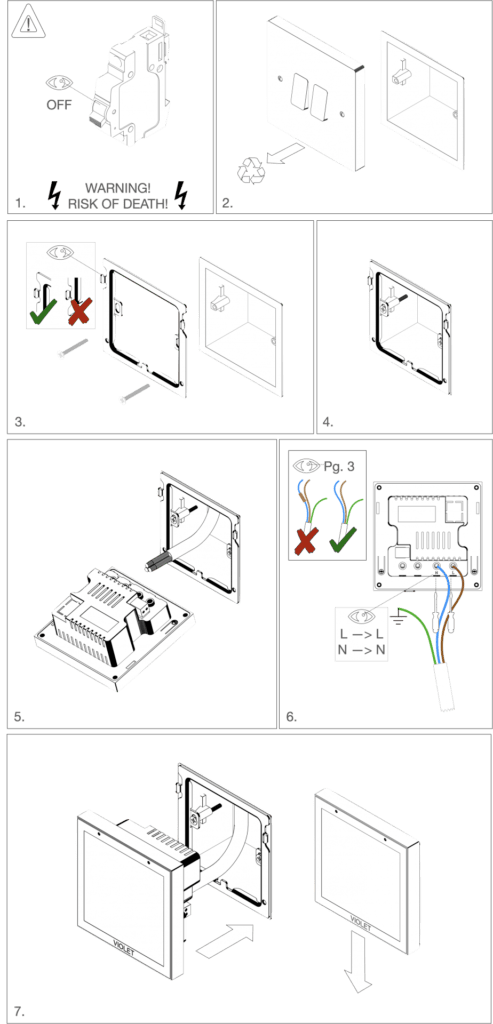
Now the hard bit is out the way, it’s time to install your Smart Switch. As always, ensure that your power is off before attempting the installation and then you can begin. Please take a look at our helpful guide on how to separate the wall plate if you’re finding it difficult.
Follow the guidance on the diagram and remember when you get to step 7, do not force the Smart Switch into the back box as it could cause damage. If you’re having to be firm, check that nothing is blocking it from being seated and trim parts down if necessary.

In conclusion, now that you know How To Install A Smart Light Switch, you can take the first step in upgrading your home to a smart home. With the added convenience of remote access to your lighting, you can enhance your overall home automation experience and enjoy a more comfortable and energy-efficient home. Don’t wait any longer, get started today and transform your home into a smart home!


